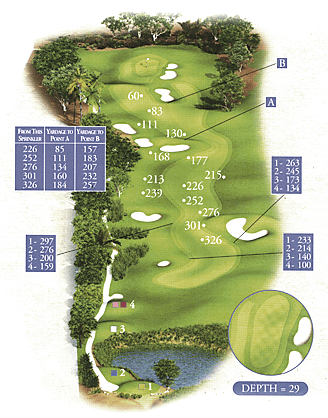
Hole 1
A gentle start to your round with a nice wide fairway. The prevailing wind from the east adds a little spice and your second shot requires accuracy with the green being narrow and two strategically placed bunkers need to be avoided.
| Yardages | |||
|---|---|---|---|
| 446 yards | 407 yards | 388 yards | 370 yards |
Hole 2
A wonderful par 5 that works its way uphill and left to right. The second shot requires the golfer to clear some large cross bunkers. Once again the third shot is to a long narrow green that is all the more difficult to hit when the prevailing left to right wind is blowing.
| Yardages | |||
|---|---|---|---|
| 563 yards | 543 yards | 514 yards | 435 yards |
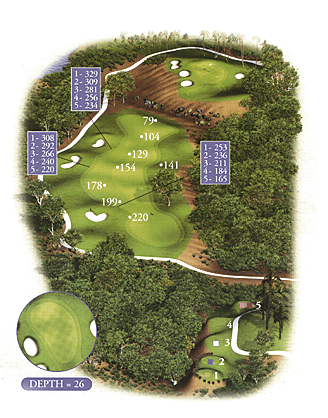
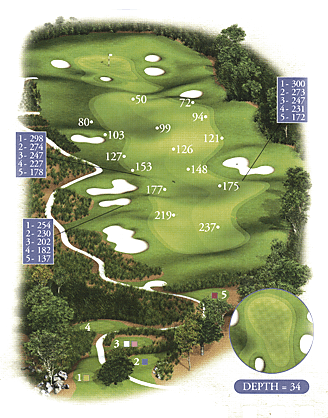
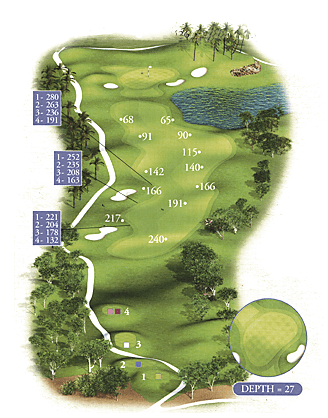
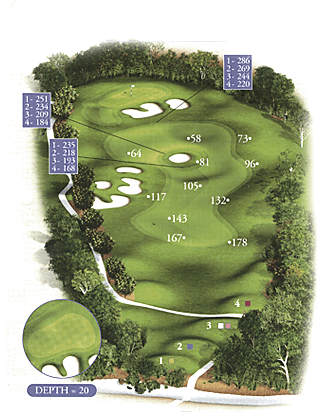
Hole 3
This hole demands the golfer play from a high tee to a raised green that offers only rocky out crops and bunkers to the rear. The key to overcoming this hole is in selecting the correct club. Often good shots get punished badly if the club selected is not right.
| Yardages | |||
|---|---|---|---|
| 179 yards | 165 yards | 156 yards | 144 yards |
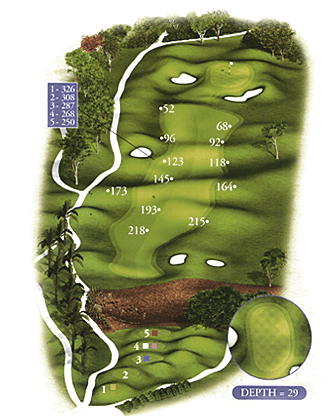
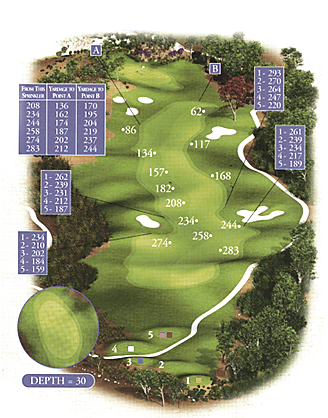
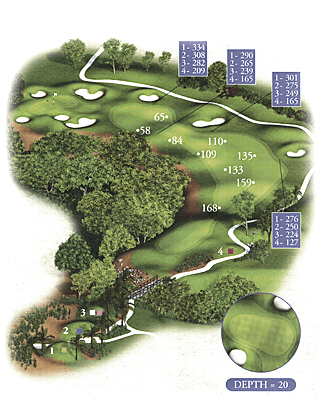
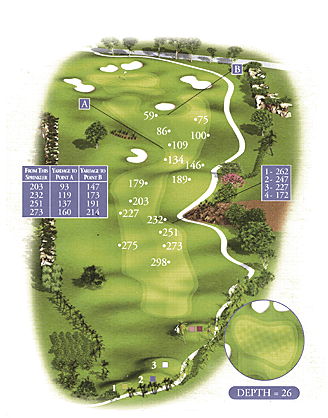
Hole 4
A challenging long par 4 that requires a tee shot to the right side of the fairway. An errant drive will receive maximum penalty. Once on the green, the tricky slopes and a little grain will get the golfers full attention.
| Yardages | |||
|---|---|---|---|
| 466 yards | 439 yards | 413 yards | 339 yards |
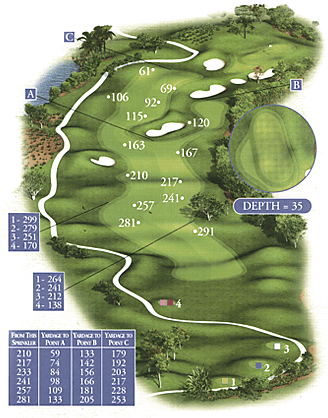
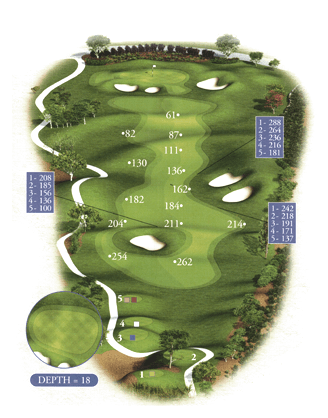
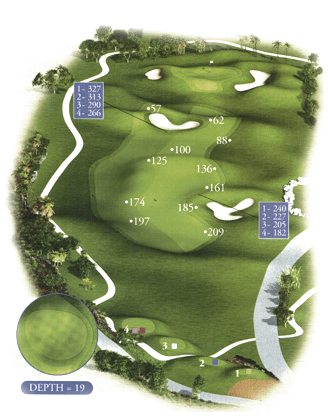
Hole 5
A short par 5 that can offer a birdie opportunity. Like many Westmoreland holes however trouble awaits errant shots and if the ball comes to rest above the pin on the green the golfer must give the putt full respect.
| Yardages | |||
|---|---|---|---|
| 504 yards | 475 yards | 458 yards | 431 yards |
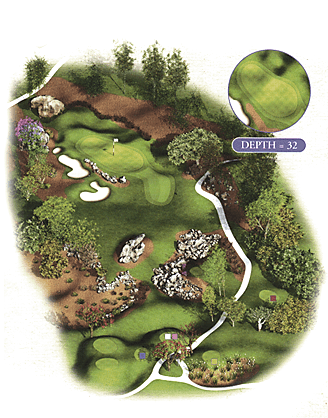
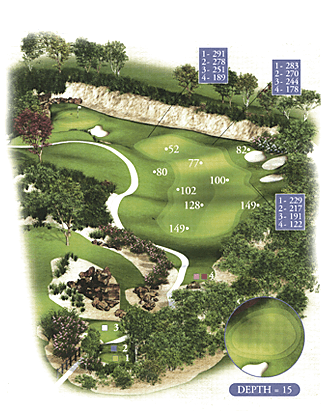
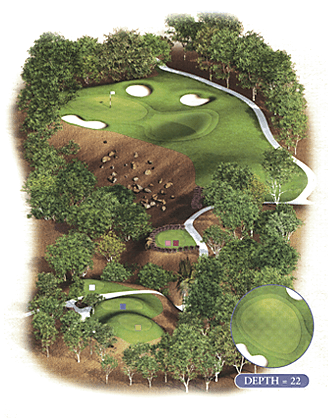
Hole 6
This hole is a real card wrecker. The tee shot is played uphill over Bougainvillea bushes and a deep gully borders the right side of the fairway. A short iron second shot is played to the golf courses smallest green that is set in an old quarry.
| Yardages | |||
|---|---|---|---|
| 335 yards | 322 yards | 296 yards | 231 yards |
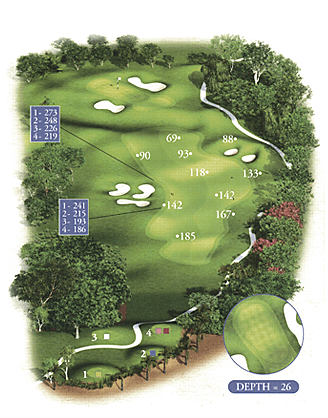
Hole 7
A medium length par 3 that sees water run from the teeing rounds to the front of the green. Any ball coming up short will be wet. The golfer has some room to play safe to the right side of the green, but if this option is taken it will leave a longer chip and run shot across the green.
| Yardages | |||
|---|---|---|---|
| 167 yards | 156 yards | 134 yards | 102 yards |

Hole 8
Extended in recent years, the hole plays down hill right to left with three large fairway bunkers on the brow of the hill down the left hand side. The second shot requires a mid to short iron that may have to fly the bunker situated on the front left of the green.
| Yardages | |||
|---|---|---|---|
| 399 yards | 371 yards | 351 yards | 343 yards |
Hole 9
The most demanding hole on the front nine. Fairway bunkers on the left side of the hole seem to have a magnetic quality to them. The second shot can require anything from a mid-iron to a three wood. The green itself is protected on the left side by a tricky little bunker. This however is a better place to be than the lake located to the right of the green. A four on this hole is happily accepted.
| Yardages | |||
|---|---|---|---|
| 442 yards | 426 yards | 400 yards | 355 yards |
Hole 10
The most demanding tee shot is required on this virtual 90 degree right to left dog leg. A large gully runs in front of the tee along the left side of the hole and around the rear of the green. If the fairway is found, the second shot is a case of hitting a precise iron the correct distance.
| Yardages | |||
|---|---|---|---|
| 402 yards | 376 yards | 350 yards | 260 yards |
Hole 11
Every golf course has a hole like this. The yardage on the card and the distance the hole plays bear no resemblance. Uphill all the way from tee to green into the prevailing head wind means you can add a good 20% onto the printed yardage.
| Yardages | |||
|---|---|---|---|
| 429 yards | 377 yards | 356 yards | 321 yards |
Hole 12
The first of the back nine par 3 holes is a long hole played uphill. You’ll want to focus on hitting the right side to the green and so playing away from the gully that runs the entire length of the hole.
| Yardages | |||
|---|---|---|---|
| 205 yards | 185 yards | 162 yards | 124 yards |
Hole 13
Our longest par five, bur the one most likely to be reached in two by the accomplished player. Downhill and prevailing wind mean a birdie is a possibility. However the golfer must take the time to get off to a good start and position the tee shot if they are to take advantage.
| Yardages | |||
|---|---|---|---|
| 608 yards | 595 yards | 575 yards | 500 yards |
Hole 14
Once a bland par 4, however recent changes to the bunkering and the location of the out of bounds mean it now has some real bite. Being the highest point on the golf course the trade winds will always be a factor on a second shot played over deep bunkers positioned in front of the green.
| Yardages | |||
|---|---|---|---|
| 319 yards | 302 yards | 277 yards | 248 yards |
Hole 15
The final par 3 and no respite. Just over 200yards from the gold tee and steeply downhill over a deep gully located in front and down the right hand side of the green. If the golfer bails out to the left, two tricky little bunkers lie in wait and leave a shot to the green with the gully located behind the target.
| Yardages | |||
|---|---|---|---|
| 217 yards | 189 yards | 155 yards | 117 yards |

Hole 16
A true three shot par 5. The tee shot challenges the golfer to both the left and right side of the hole. The green is situated above the golfer; therefore the bottom of the pin is hidden when you play your approach shot. Often you'll walk to the green expecting to see the ball close to the pin, only to find its spun back or you've come up short.
| Yardages | |||
|---|---|---|---|
| 503 yards | 488 yards | 469 yards | 415 yards |
Hole 17
The tee shot offers the golfer a generous fairway and only the wildest of shots can find the trouble on either the left or right side of the hole. The secret to this hole is the second shot with a substantial slope at the front of the green and a two tier green that affords the smallest of targets when the pin is located on the shelf to the left.
| Yardages | |||
|---|---|---|---|
| 413 yards | 399 yards | 376 yards | 322 yards |
Hole 18
A memorable finishing hole. Firstly the golfer can forget the golf and admire the breathtaking view. However when it’s time to play you better be ready with a good straight one. Trouble abounds all the way from tee to green. Once on the fairway the golfer must still fly the gully that lies before the green. Any par on this hole is well earned.
| Yardages | |||
|---|---|---|---|
| 461 yards | 445 yards | 419 yards | 370 yards |